Filezilla Server is a free software to create your own FTP server in a few simple steps. It can be said that it is the server counterpart of the well known FTP client application Filezilla.
Filezilla Server Free supports both FTP and FTPS, also using Let’s Encrypt (while Filezilla Client also supports SFTP, S3 and StorJ), and can be installed on any Windows, macOS or Linux system to provide file upload and download service, using any FTP client or backup software. The FileZilla Pro Enterprise Server, a commercial edition, also supports SFTP and Two-factor authentication.
See also: How to make an incremental FTP backup (upload) with Iperius
In this short tutorial, we will show how easy it is to install and configure Filezilla FTP server.
First of all, let’s download the setup from the official website: https://filezilla-project.org/download.php?type=server
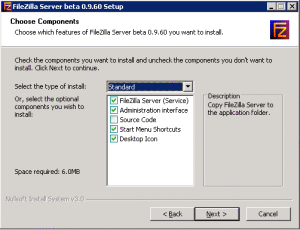
Start the setup and proceed with the following steps:
Select the components to be installed as shown in the image above.
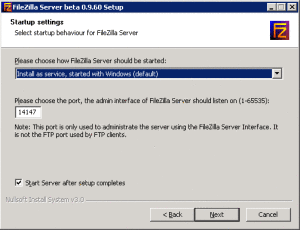
Proceed to the next step, where you can find the following important configuration:
We recommend leaving the default settings for starting the service. FileZilla server will be installed as a Windows service and will then start in the background each time the machine is started. This option is obviously necessary when you’re installing FileZilla on server systems. As for the port for the FTP server administration panel, you can use the default number or specify a different one for security reasons. You can use any port number that is not already in use, for example 8387 (note: this is not the FTP port, but the port for FTP server administration).
Leave the option checked to start the server after the installation completes.
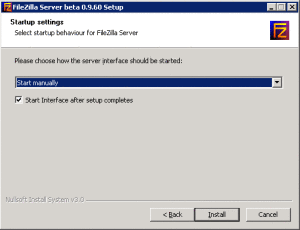
In the next screen, set up to start the FTP server management interface manually (otherwise it will start at each user logon). Leave the option checked to start the management interface as soon as the installation is complete.
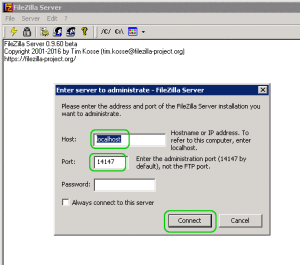
Click now on the “Install” button to complete the installation. Once the installation is complete, the management interface will be immediately opened, as you can see in the image below:
The FTP server service at this point will have already been started, so through this interface you can connect to it to configure the server parameters. Since this is the local machine, you can leave “localhost” and specify the port (here you can see the default one, otherwise you have to specify the one you chose during installation). You can leave the password empty, because by default it is not set, and click on “Connect”.
So let’s move on to the basic configuration of the FTP server, which will allow you to immediately perform an upload test of some files.
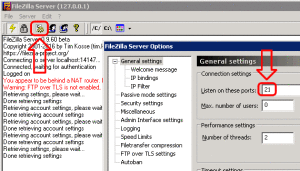
Click on the button to open the general preferences, then set the FTP connection port. The default one is 21.
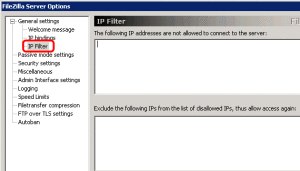
If you want to use this FTP server to offer a public service, you may need to block some unwanted IP addresses, or to restrict the connection only to certain IP addresses. Let’s see this setting in the image below:
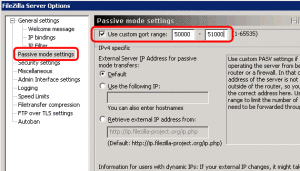
If you do not want to allow incoming connections on all ports or if your FTP server is behind a NAT router (so to allow connections from outside your network), you need to tell FileZilla Server to use a specific range of ports for passive-mode connections. These ports must then be opened on the firewall. If you have a NAT router, you need to forward these ports to the local machine where FileZilla Server is installed. Depending on the router model, you can forward a range of ports or you must forward all ports individually.
Valid ports can be between 1 and 65535, but ports below 1024 are reserved for other protocols. It is better to choose ports >= 50000 for FTP in passive mode. Due to the nature of TCP (the underlying transport protocol), a port can not be reused immediately after each connection. So the range of ports should not be too small or the transfers of multiple small files can fail. In most cases, a series of 50 ports should be sufficient. Let’s see the simple configuration in the following image:
If you do not want to allow connections to your FTP server from the Internet, and therefore for use it in the local network only, you can ignore these passive mode settings.
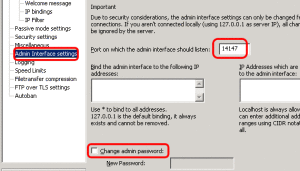
In the options related to the administration panel, you can set some important configurations, including the connection port, a password, and a possible restriction only to certain IP addresses:
Another interesting possibility is the bandwidth limitation (Speed Limits), ie the maximum speed allowed for upload and download. This can be very useful if you host the FTP server in your network and do not want any large file transfers to saturate the entire internet band.
FTP over TLS:
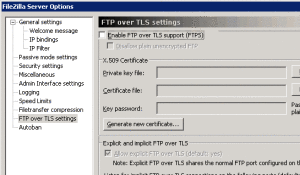
Finally, there are also the FTP over TLS options, which are the security options to enable FTPS connections. In order to do this, we clearly need to purchase a certificate (you can do that at GeoTrust, DigiCert, GlobalSign, Symantec, Thawte, etc.). However, Filezilla Server also supports Let’s Encrypt, i.e. free certificates. This eliminates the annual security certificate renewal cost. Here we find a useful guide on how to configure Let’s Encrypt with FileZilla Server: https://filezillapro.com/docs/server/advanced-options/lets-encrypt-filezilla-server/.
As you can see in the image below, if you want to enable this option, you need to specify the certificate file and password:
You can find useful guides for this configuration also at the companies from which you can buy the certificate, like this: https://www.digicert.com/ssl-certificate-installation-filezilla.htm
We have therefore concluded our overview of the main Filezilla Server settings. Now we can proceed to another important configuration, namely the creation of a user account for the connection and the folder where the files will be saved on the server.
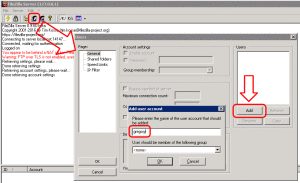
Open the user management as shown in the image below:
Click on “Add” and specify a username. You can create groups before and assign each user to a specific group. In this case we do not specify any groups.
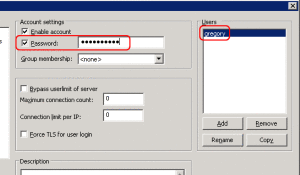
As soon as the account is created, you need to set its FTP password:
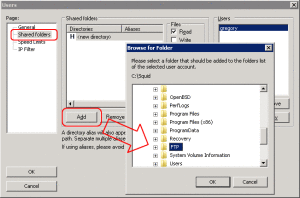
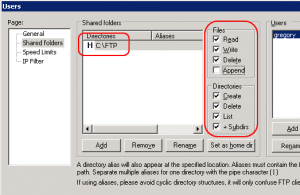
Then click on the item “Shared folders”, to set in which folder the FTP server must save the files sent by this user:
The selected folder will be the home directory of the user’s FTP space. In the image below you can see how it is therefore necessary to set all the permissions, to allow the user to manage in the most complete way the files in his space. Writing permission is obviously essential to allow uploading:
Click on “OK” to save the user and his configuration.
Now one last major configuration remains to be made in the system to allow connections to this server, ie we need to open the FTP port on the Windows firewall (or on other firewalls if necessary). Here we have chosen the default port, 21, but it can obviously be any other port.
At this point you can already connect to the FTP server, using the IP address of the machine where you installed Filezilla Server and the credentials of the user account you created. Recall that if you are in a local network it is not necessary to use the passive mode. To connect you can use any FTP client like Filezilla, WinSCP, Cyberduck, etc., or use the FTP client integrated in Iperius Backup.
An FTP server inside you network, on a dedicated machine, can be used to perform network backups safely, quickly and protected from ransomware viruses. In fact, you can have a better security level than simple shared folders, better manage the data transfer bandwidth, allow access only to specific IP addresses and better manage user permissions. For FTP backup you can certainly use Iperius Backup, as shown in this tutorial. With Iperius, the security level of an FTP backup is very high. As we said, it is possible to use it for a file backup on Filezilla Server without having to share folders on the network. This allows us greater protection against ransomware, which does not access FTP servers, and also a greater possibility of configuring permissions and bandwidth consumption.

Thanks for the useful tutorial.
Thanks for the useful tutorial.