In this article we will talk about how to install docker and what is container virtualization.
Forget about the times when virtual machines were needed to test an application or to evaluate a particular infrastructure. Long start-up times, with considerable commitment to resources and physical memory space, and often scarce and questionable results.
Today there is the world of containers, docker in the first place.
Container-based virtualization
In a container all the application code, libraries and dependencies are grouped together to create an entity that is always similar to itself in the performances, regardless of the boundary conditions of the infrastructure.
A completely open-source project that sees the birth in 2013 and that was originally usable only by Linux systems.
Today, thanks to LibContainer, developed by Docker itself to replace the “old” Linux virtualization system, it can also be used by Windows and MacOS users.
To have a container virtualization system it will therefore be sufficient to install the Docker platform, made by the following few fundamental elements:
Docker Image
A docker image is a multi-level file used to deploy and run an application in a Docker container. In fact, it includes all the necessary instructions (system libraries, other files and dependencies) to make the application executable.
It is a modular file, in the sense that parts of it can be reused to create subsequent releases or other images from scratch.
Docker Hub
It is a cloud-based registry service that includes repositories of images already created by the community.
The online service (available at this address) is divided between public and private. In the public section it is possible to find Images developed by the community, while in the private section those not publicly shared, created for example by a specific group, like a working team.
Docker Engine
It is the heart of the project and is an open source client-server application whose basic architecture is composed of a daemon with server functions, a programming interface (API) based on REST (Representational State Transfer) and a command line user interface.
Clients and servers can be on the same system or on two separate systems. In any case, communication between client and server takes place thanks to the REST API, through UNIX Sockets or a network interface.
The daemon runs in the background on the host system and is used for central management of the Docker Engine. With this function it creates and manages all the Images, containers and networks.
The docker build commands (create an image in support of a docker image), docker pull (take an image from the docker hub) and docker run (start a container) are just some of the commands used to communicate with the terminal daemon.
Differences between Docker Enterprise and Community Edition
Docker is a completely free service if used in the Community version, while the Enterprise version reserves plans at different prices depending on the operating systems on which it must run.
The Community version is aimed at small businesses, for testing operations and to start understanding and discovering the world of containers.
In case you want to do business and publish applications for which a considerable commitment to security is also necessary, it will be more appropriate to choose the Enterprise edition, that adds technical support (even 24h /7), the Docker Security Scanner (which scans the docker images looking for any vulnerabilities), longer maintenance on the software and much more.
Install Docker
We have said that today Docker is usable on any Operating System and the installation methods depend on which system is used.
The success of Docker is partly also due to its Community and the wide possibility of finding information and guides, starting from the installation page, where steps to be taken are very clear and detailed.
Installing Docker means installing Docker Engine, whose binaries for the Community version are available at this address, while for the Enterprise version they can be found on the Docker Hub.
We tested the installation on a Debian system (9.4 Stretch stable) following the official guide of Docker and choosing the method through repository, but it is also possible to use the most direct way with the package you can get from the download page.
To install the Docker container platform you need the root access rights for the host system.
- Switch to root with the command
$ sudo su - Run the repository update
# apt-get update - Install everything that is needed to complete the next steps.
# apt-get install \
apt-transport-https \
ca-certificates \
curl \
gnupg2 \
software-properties-common
- Add the official GPG (GNU Privacy Guard) Docker key
# curl -fsSL https://download.docker.com/linux/debian/gpg | sudo apt-key add -
- Verify that you have the fingerprint key
9DC8 5822 9FC7 DD38 854A E2D8 8D81 803C 0EBF CD88
# apt-key fingerprint 0EBFCD88
- Set up the stable repository. You can also add the nightly or test repository.
In this case, add one (or both) words.
# add-apt-repository \
“deb [arch=amd64] https://download.docker.com/linux/debian \
$(lsb_release -cs) \
stable”
- Run the repository update
# apt-get update - Install the latest version of Docker Engine – Community and containerd
or choose a specific version (we chose the first option)
# apt-get install docker-ce docker-ce-cli containerd.io 
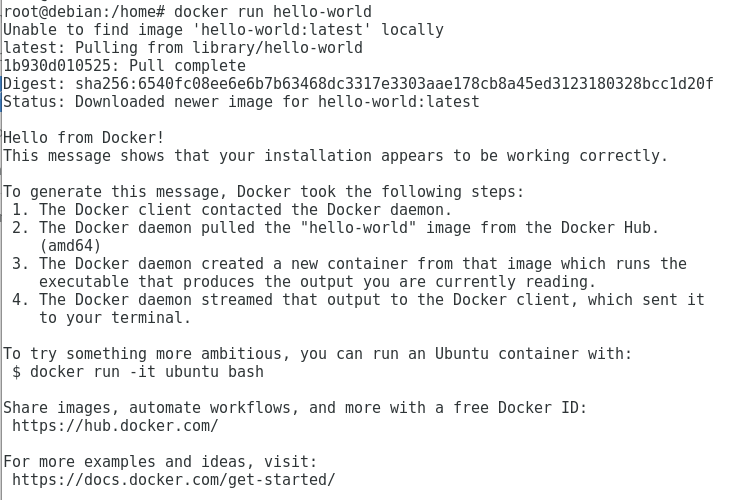
- Verify the correct installation and operation of the Docker Engine – Community
# docker run hello-world
The system has been correctly installed and functioning.


PLEASE NOTE: if you need technical support or have any sales or technical question, don't use comments. Instead open a TICKET here: https://www.iperiusbackup.com/contact.aspx
**********************************************************************************
PLEASE NOTE: if you need technical support or have any sales or technical question, don't use comments. Instead open a TICKET here: https://www.iperiusbackup.com/contact.aspx
*****************************************